As I mentioned before I am taking a course in printmaking, so far we have focused on etching and its various methods.
It is as many can imagine, very exciting, frustrating and humbling.
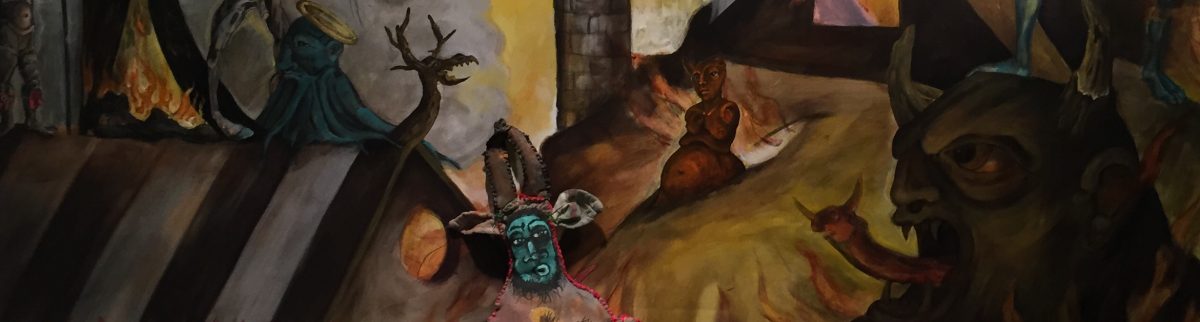
But I am thrilled to be gaining this knowledge. The following image is my first complete print, which consists of three distinct processes: hardline etching, soft ground texture and aqua/mezzotint.
Predictably I have chosen my beloved Quetzalcoatl sowing his seed (naughty innuendo intentional) .

etching
6 by 5 inches
First off, please understand I am still trying to master the most basictechniques; my stylus slips all over the zinc plate, my hand is unsteady and insecure, this clumsiness is apparent .
But at this stage I really am trying to merely understand the process and the opportunities afforded by this new medium.
The first stage of this print is hardline etching, pretty basic ; you press your stylus into a plate prepared with a base coat of hard asphaltum. Warm the wax on a giant hotplate, you roll it out, cool it and presto, a lovely surface to doodle upon.
Unfortunately i have yet to master line control on this slippery surface.
Patience and practice… first stage follows:

The second plate, adds texture and mood (or so I am told), frankly it is my least favorite stage.
I prefer creating texture by hand.
In this assignment I was instructed to press textured material into the plate which had been prepared with a softer ground of asphaltum than we had used for the hardline step.
I chose, given the print’s very small size, wisps of broken cheesecloth and snippets of an ungodly 70’s textured wallpaper.

The third plate, which was to be our last, was aquatint, a variation on mezzotint (made famous by Goya).
This was the most challenging step, values are determined by timed soaks in an acid bath.
Having first fashioned (a time consuming) value chart , I had a sense of how to achieve the values I sought; or so I thought.

Unfortunately my timing was off, I hadn’t created any blacks; a problem in that I wanted them, and more importantly the assignment demanded them.
Back to the acid bath, blocking out the areas I wished to keep with a material called Stop Out ; then with careful timing, seeking to attain my goal of a richer black foreground.

I achieved what I sought, I would make changes if I could have better predicted the outcome, but I am pleased that I am beginning to better understand the complexities and opportunities of etching.
My appreciation for my own collection of 18th and 19th century engravings and etchings has soared beyond mere aesthetic appreciation ; what was accomplished by these past masters is technically astounding.
A technique I was eager to play with was drypoint.
I have a few drypoint prints in my collection, I love the evocative smudgy quality of the images. Rembrandt of course made the technique famous, but others have mastered it as well.
It turns out (thus far) to be my favorite technique.
It also proves to be the most challenging, this little (3 by 4 inches)Ecce Homo is my first incredibly naive attempt.
It is a brutally ugly image, I’m frankly embarrassed by it; but Clive has encouraged me to revel in the process.
So here is what reveling in the process looks like.
God save me.

drypoint
4 by 3 inches
Tomorrow we start a new process, soft ground etching. It is a process my insructor believes offers artists the freedom drawing affords. In anticipation I have put together this finished drawing of Cain. I understand the final image will not retain the precision, but I like to work out all details BEFORE facing an acid bath. I will post the result and perhaps some of the process when I am finished.

preparatory drawing on paper
6 by 5
Until next time,
take care,
LG

wow! thank you a lot for showing the steps of this process–i really love your quetzalcoatl and am fascinated by what happened in the third step. the sky seems like liquid fire, (the the feathering on the right is flame-like as well) it’s quite astonishing! i look forward to more!
Thank you my friend, i spent the afternoon rather unsuccessfully creating a cohesive series; frustrating, each plate (of the nude figure drawing-Cain) came out JUST a wee off from one another. They must be alike…Will keep trying:)
LG
I really like the Quetzalcoatl, it has lots of life in it! I have an awkward first print, and a second one (a softground one) that only my husband and the people in the studio that day have seen… because I wasn’t prepared with a drawing beforehand (I’d missed the first day). But I can see you wont fall into that same predicament.
And of course, if there’s something that you don’t like about a plate, just change it. When I was learning etching the man who taught me was always saying not to worry, everything can be changed if you want to… I’m not sure everyone always stresses that fact. It’s just a matter of scraping the plate back down and then smoothing it out again with a burnisher. But really, it looks like things are going really well. Thanks for sharing these!
Please pardon my delay in responding. Thank you for the kind words. I am learning about burnishers & erasing errors from the plate, although often it seems easier to just begin anew. I have made some progress, will post soon as possible, my classes are proving time consuming- plus life and studio.
Thanks again,
Len
hello again, I meant to ask, as from your website I have seen many wonderful etchings ; is copper a better surface? We have been using zinc and frankly I am hampered by it. I am getting better- I love drypoint- but it is difficult to feel “free”. Curious as to your opinion.
Len
I guess copper is a slightly softer metal. I’ve heard steel is good for drypoint since it’s harder and so you can make more copies before the burr wears down, but I’ve never gotten a hold of any. To be honest I’ve only used copper so I can’t compare it to zinc or anything else… everyone I knew who made prints always said copper was better and not to bother about zinc, and so I’ve never got around to trying it. I am somewhat curious to try zinc, but now that I’m printing from home it’s not too practical since I’d have to have a whole separate batch of acid. I thought that the main benefit of zinc was that it was cheaper, but over here it seems to be priced about the same as copper these days. Though maybe a better grade of copper plate would be more expensive. Anyway, I’m probably not the best person to ask… we moved from Paris before I had learned all that I wanted to and I don’t go to the studio here because it’s expensive and I just can’t afford it.
Oh, and scraping and burnishing gets easier once you are more used to it! I found it frightening at first, but it got better. And I’m glad to hear that things are coming along!!
Well I’m going to look into copper, my instructor pooh-poohs copper as too fancy and unnecessary but he also doesn’t really appreciate the sort of traditional approach to detail that I am in interested in. Thank you for the encouragement, i will hone my burnishing skills!
The fourth plate is extremely cool, I really like it!
An old dog learning new tricks is always inspiring.
Woof